Introduction
Object actions provide unique business logic for object entry events that can be executed either automatically or manually. For example, sending email notifications following entry modifications, delivering entry event data to a webhook URL, and running custom Groovy scripts after an entry is added.
When applying automatic triggers, Liferay listens for the event to occur and then automatically performs the action based on specified conditions.
In order to use the standalone trigger, Liferay creates a headless API and adds the action to the Actions menu ( ![]() ) for object entries. You can map the action to a button fragment, but it has to be executed manually.
) for object entries. You can map the action to a button fragment, but it has to be executed manually.
Prerequisites
Liferay 7.4+
Creating Object Action:
- Go to the desired Object you want to add an action and click on the Actions tab and click Add (
 ).
). - In the Basic Info tab add necessary information and turn on the Active button to activate object action.
- To define the custom trigger, conditions, and action, select the Action Builder tab.
Trigger:
| Trigger | Description |
|---|---|
| On After Add | When the object entry is added |
| On After Attachment Download | When the object entry attachment is downloaded |
| On After Delete | When the object entry is deleted |
| On After Update | When the object entry is updated |
| Standalone | Triggered manually on the object entry Action button |

Condition:
Check Enable Condition to add an expression so that the action is being triggered only if the condition is fulfilled. Click Code ( ![]() ) for the reference to available expressions.
) for the reference to available expressions.

Action:
Liferay Objects provides these action types:
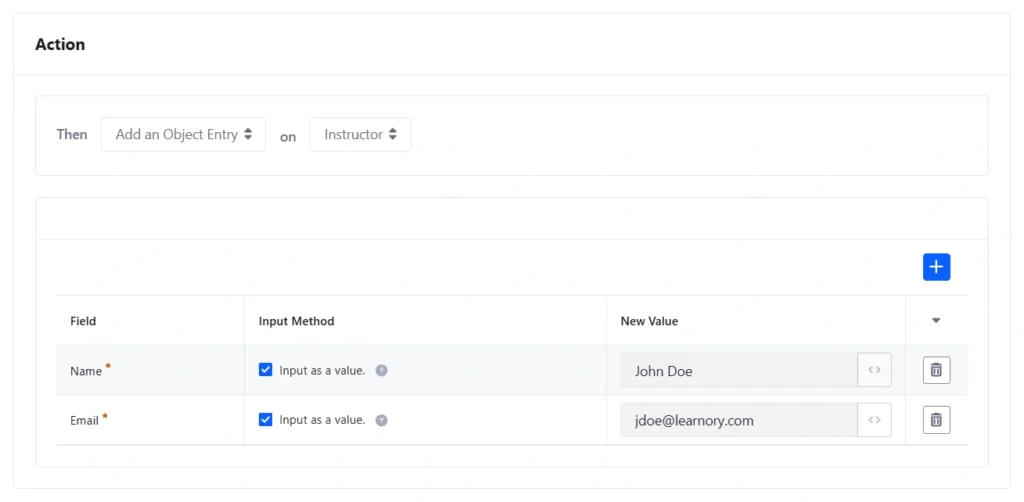
- Add an Object Entry: Create entries for an active object.
- Notification: Send email or user notifications based on an existing template.
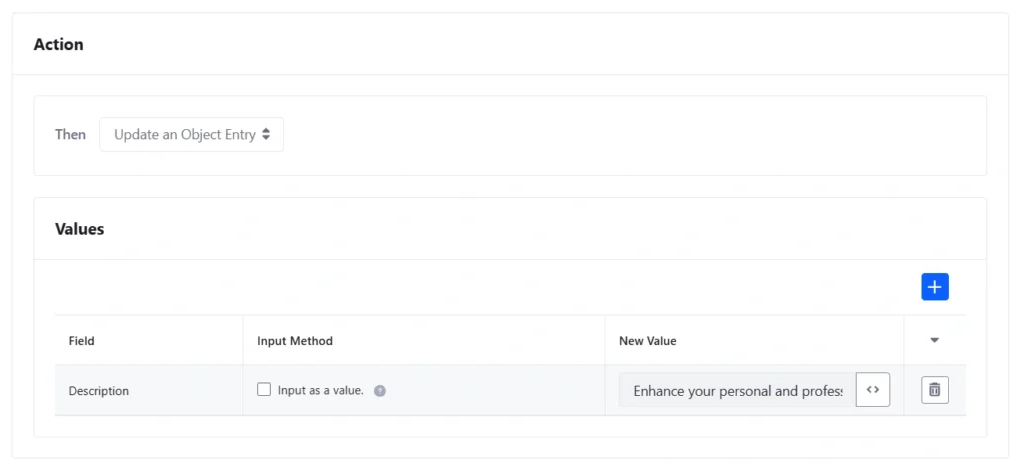
- Update an Object Entry: Update the fields in the current object entry.
- Webhook: Deliver a payload to a URL.
- Groovy Script: Execute Groovy scripts.
Note:
From DXP 2024.Q2/Portal 7.4 GA120, due to security reasons scripting is disabled by default. You can enable it in System Settings → Script Management (under the Security category).
1. Add an Object Entry:
To add an entry automatically using actions, it is required to first select a published object. Once you select an existing object, it shows all required fields if any or you can add more fields by clicking Add ( ![]() ) button.
) button.
When defining the values for these fields, you’ll notice an Input as a Value checkbox. Here’s how it works:
- Checked: A predefined static value will be added to the field.
- Unchecked: Either a predefined value or an expression will be used which sets value from the object dynamically.

2. Notification:
Notification actions can be used to send user or email notifications for object entries.
Choose a notification template to identify sender, recipient, and content for each message. Your instance also needs a configured mail server for email notifications.

3. Update an Object Entry:
To update fields of current object entry, select Update an Object Entry.
To update the existing object, you must select the field or fields and enter new values. To use expressions that set values dynamically, click Code ( ![]() ). Alternatively, you can input these values directly.
). Alternatively, you can input these values directly.

4. Webhook:
Webhook actions are like secret messengers! They send data packages to a specific web address. You'll need to tell Liferay where to send this information. And for extra security, you can add a secret code to make sure only authorized recipients can access the data.

5. Groovy Script:
Groovy scripts are used to perform specific tasks. Enter the inside the code block and hit save. Liferay provides some predefined variables which we can use directly in the script.

While the examples above showcase automatic action triggers, there are scenarios where manual actions may be necessary. Let’s explore how to effectively integrate and implement them.
Manual Actions:
The actions become manual rather than automatic when you apply a standalone trigger for object actions. Use these techniques to get started these actions:
- The object’s UI
- Dedicated action APIs
- Buttons in pages
Select Standalone option from the action trigger.
Trigger actions via the Object Entry UI:
Active standalone actions are accessible through the Actions menu in object entries. Use the UI to execute these actions.
- Go to the object entries page and click on the Actions button (
 ).
). - There you can find the standalone action just created.

Trigger Actions via APIs
Liferay will automatically create headless APIs for all published objects. It consists headless APIs
To find these APIs,
- Open Liferay’s API Explorer at
[server]:[port]/o/api(e.g.,localhost:8080/o/api) - Click REST Applications and select your custom object definition. You can find the objects with
c/[pluralobjectlabel]naming pattern (e.g.,c/courses).
For each standalone action, Liferay create two PUT headless APIs: one that uses the entry’s ID and another that uses the entry’s external reference code (ERC).

Trigger Actions via Pages:
Actions via pages in Liferay can be created using fragments. You can map standalone actions to buttons on either content pages or display page templates.
- Mapping actions using Liferay’s out-of-the-box (OOTB) buttons:
- Add the button widget to the page by dragging and dropping it, then click on the link submenu of button.
- You can find the Mapping tab in the properties menu on the right side. Select the desired object entry from the list by clicking on Item.
- From the Field dropdown, navigate to the Actions section and select the appropriate action.

- Mapping actions using customized buttons:
- Create a new basic fragment and add the attributes
data-lfr-editable-id="action"anddata-lfr-editable-type="action"to the button tag.
- Create a new basic fragment and add the attributes
<button class="btn btn-primary" data-lfr-editable-id="action" data-lfr-editable-type="action">
	Send Mail
</button>-
- After creating the custom fragment, follow the same steps as described for the OOTB buttons above.
- You will find a specific section called Actions in the properties menu. Click on the Action tab and select appropriate object entry item and action.
- You will find two sections: Success and Error Interactions. You can explore all options in which the object actions were successful or failed.

Object Action Permissions:
Permissions are automatically generated by Liferay to manage which roles are able to perform stand-alone actions. Every permission follows the action.[actionName] naming pattern (e.g., action.sendMail).

Conclusion
Liferay's Objects framework provides a robust system for designing and managing object actions, allowing users to automate processes and enhance functionality within their applications. Businesses can tailor actions by understanding the various action types—such as notifications, webhooks, and Groovy scripts. The platform also supports manual actions, which can be triggered via the user interface, APIs, or page buttons, allowing for greater flexibility in execution. This comprehensive approach to object actions allows users to create dynamic, responsive applications that speed up workflows and improve user engagement.

